JUnit Tutorial Basics to Advance:
In this blog, we are going to learn about JUnit 5 Tutorial. Here it contains unit testing in Java from basic to advance level. Learn JUnit to increase code quality and assurance.
What is JUnit and why we need to learn JUnit in Java. With the help of JUnit, we can identify how the method is working, whether it’s accepting proper parameters and giving the expected results back.
Sometimes we need to check whether our exception handling is working as expected, we can write test cases. Also in case of new addition to the code we can see if newly added code is working as expected with the help of JUnit.
Features of JUnit:
- JUnit is an open source framework, which is used for writing and running tests in Java.
- It provides test annotations for testing and assertions for testing expected results.
- JUnit allows you to write quality code, It’s less complex and less time-consuming.
- Provides test runners for running tests and it also shows the progress and errors.
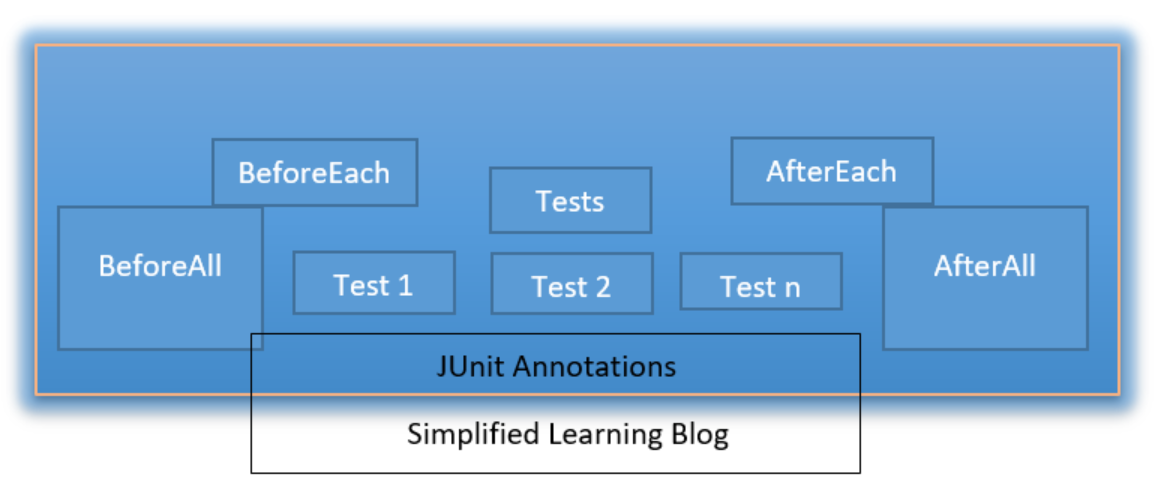
JUnit 5 Tutorial : Annotations used in JUnit:
These are the annotations provided by JUnit to write test cases.

@Test: Used on top of the method to identify that this method is a test method:
@Test // Test annotation indicates this method is test method
public void testCalculation(){
//statements...
}
@BeforeEach: This annotation indicates that this method will be called before each test.
@AfterEach: This method will be called after each test.
@BeforeClass: This annotation indicates that the method will be called only once, before calling all the tests.
@AfterClass: This annotation indicates that the method will be called only once after finishing all the tests.
Simple JUnit Example class: (We are using JUnit 5 here) :
package com.slb.core.unittest;

import org.junit.jupiter.api.*;

public class JUnitTestCases {

    @Test
    public void testMethodDemo(){
        System.out.println("in test method 1");
        assert 4 == 4;
    }

    @Test
    public void testMethodDemo2(){
        System.out.println("in test method 2");
        assert "SLB" == "SLB";

    }

    @BeforeEach
    public void testBeforeEachDemo(){
        System.out.println("in before each method");
    }

    @AfterEach
    public void testAfterEachDemo(){
        System.out.println("in after each method");
    }

    @BeforeAll
    public static void testBeforeAllDemo(){
        System.out.println("in BeforeAll method");
    }

    @AfterAll
    public static void testAfterAllDemo(){
        System.out.println("in AfterAll method");
    }
}
Output of the above test class execution:
Refer https://github.com/c-gb/java8-examples/tree/main/src/com/slb/unittest for all code.
in BeforeAll method
in before each method
in test method 2
in after each method
in before each method
in test method 1
in after each method
in AfterAll method
Note that AfterAll() and BeforeAll() methods are static, otherwise you will get below exception:
Test ignored.
Test ignored.
org.junit.platform.commons.JUnitException: @BeforeAll method 'public void com.slb.core.unittest.JUnitTestCases.testBeforeAllDemo()' must be static unless the test class is annotated with @TestInstance(Lifecycle.PER_CLASS).In the above code example, we are using an assert statement, so what is an assert statement?
An assertion is a statement in the Java programming language that enables you to test your assumptions about your program.
assert Expression1 : Expression2 ;Next topic: Assertions

For over 15 years, I have worked as a hands-on Java Architect and Senior Engineer, specializing in building and scaling high-performance, enterprise-level applications. My career has been focused primarily within the FinTech, Telecommunications, or E-commerce sector, where I’ve led teams in designing systems that handle millions of transactions per day.
Checkout my profile here : AUTHOR https://simplifiedlearningblog.com/author/